
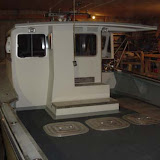
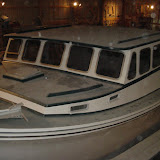
 This post was started yesterday but was never finished. Only 4 posts left, I haven't ever been this excited. Today we installed a recessed Bomar hatch in the deck of the 36' Calvin. If you would like to know how to install your own hatch please continue to read. Links to product sites are highlighted in blue.
First you want to select a hatch that you like Freeman and Bomar are the most popular. Both will leak if not properly adjusted when installed but Freeman has a better locking system in my opinion. Alright now you have your hatch and location selected, cut a hole big enough to accept the hatch so the outside flange sits flat on the deck. Take a wide tipped marker and trace the hatch, an find a router with a sharp plunge style bit. Measure the thickness of the flange and add 1/16" to set your router (example: if the flange is 3/8" set the router at 7/16") Use the router to chase your marker line on the deck, make sure to remove all the marker, this extra space will be needed for the fiberglass. If the hatch falls into the hole without any more griding you should feel proud, if not grind the tight areas until the hatch fits easily into the hole. Once the routed flange area is completed round the top edge of the deck so the fiberglass can wrap over the edge. After the hole in the deck is completed wax the bottom side of the hatch ring and get prepared to fiberglass. Two or three layers of 1.5 oz Matt around the cutout should be enough depending on the level of finish. Next drop the waxed hatch ring into the wet fiberglass and use c-clamps to tighten the ring into place. After the fiberglass is completely dried pop the ring out and smooth all of the raw areas. If the hatch now can drop in and out without forcing it, get a tube of 5200 and install the hatch using 2" stainless steel screws. Nice job, glad I could help.

SHOP NEWS SHOP NEWS SHOP NEWS.
Snowed all day on Monday. Everyone was at work except Dan Jr. We glassed some of the deck down and the tanks into place on the 36' Calvin. I sanded most of the day on the 38' Northern Bay. John welded up half a cage (pictured) the other half will be done tomorrow, then he has to make two more cages. The next repair job arrived on Saturday and is sitting outside, we will try to move boats around if the weather ever improves. Its going to hover around 20 degrees all week so the boat might not get inside until next week. Awesome looking cage, anyone that needs one please contact the shop before the cage prices increase.
The old photos have been a huge hit on the web. I should have started using them as post fodder 15 posts ago, there would have been a lot less typing (and less pressure). Boat historians are working on the complete list of Clark Island vessels, and my crew of followers are sending in photos. The entire collection of boats will be online for public viewing in early 2015. These "how to" posts are easy. If have suggestions for another task you need to be guided through, leave it in the comment box.
5 more blog visits to 700, call your neighbors and get them involved.


3 comments:
a top 5 post if I ever saw one.
I'm still waiting for the electrical tutorial.. I need to rewire my truck for that water management system.
Thanks for the Hatch how-to. I like to see a how to on installing the shaft and cutlass bearings. When you get a chance of course.
How about electrical on a boat...i want a kegorator on board
Post a Comment