Saturday, June 20, 2009

Clear communication is the key.

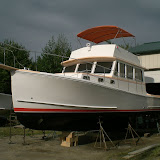
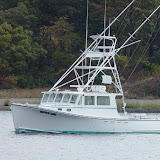
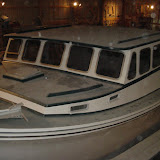
Sometimes when doing these custom projects an owner's wishes are not completely understood and this can lead to problems. Sometimes what we want to do or what we think will work the best influences our decisions during a project. Sometimes we have to make changes based on customer reactions. Native Son needed one major change, fixing the starboard side of the wheelhouse. During the design phase poor communication (on both sides) led to the wheelhouse being built offset to the port side. Once the owner saw the progress I could tell that he was bothered by it. I decided right away that it was not worth arguing and promised that I would make sure that the problem was solved. Most of the time when work has to be undone/redone the toughest part is just making the choice to start. Frustration about changes is normal but at Clark Island Boat Works the customer is always right. Anyway we were able to cut the starboard part of the windshield out make a few cuts and shift the front and side window to a more symmetrical location. This is going to improve the look of the wheelhouse and make for a very happy boat owner.

Big wires on the 38' Northern Bay. This is the back side of the custom battery switch panel that we fabricated out of aluminum and had powder coated black (to match the other electrical panels). Three switches were bolted to the aluminum and then the aluminum was bolted through the panel on the starboard side of the companionway. The switch located to the left is for the engine batteries, the switch to the right is for the house batteries, and the switch in the middle connects all the batteries on the boat. This middle switch could be called the emergency crossover connection, it will give the user the ability to start the motor with the house batteries if he accidentally kills the start batteries. Most of these wires are 4/O (some 2/O on the shorter runs) and all the lugs have been crimped on with a ginormous set of crimps. Once the ends are crimped heat shrink wrap is used to seal all the connections.

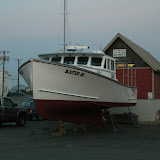
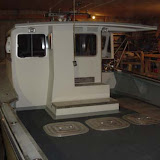
1/2" Plywood has been screwed to the overhead inside the wheelhouse of the 38' Northern Bay. This will be the layout of the teak that will be holding up the headliner. The photo won't show all the required steps and really it isn't all that exciting of an explanation so I just skim over it. Measurements, Pencil Lines, Cut Plywood, Drill Plywood, Cut Plywood, Drill Overhead, Drive Screw, Repeat. Now that the plywood is up all the wires can be run to power the overhead lights, fans, and wipers. Every wire has to be run individually (to fit under the headliner) and clipped every 4". I'm going to try to get most of the wires clipped up tomorrow (Sunday) but it might be a two day project. Holding drills over your head all day can be rough on the shoulders.

SHOP NEWS SHOP NEWS SHOP NEWS

Dan Jr has been sanding, painting, and fiberglassing hatch frames.
Jeff helped me with the wheelhouse overhead and did all the big wiring (picture 2).
John made some exhaust modifications and made a new radar stand for Native Son.
Kendall has been sanding, painting, and fiberglassing wheelhouses.
Clay had to do some skiff repair and fixed the wheelhouse on Native Son.
Dan has been looking into hull prices and availability for all the boats we have to build.
I've been keeping everyone busy, taking pictures, returning emails, and working on boats.

Friday, June 19, 2009

Pictures Only.........Its Content.

The old Kara Lee, now Breaker. Two large fish.


23' Crowley Beal. Possibly the next
boat that we are going to build.


The completed Flozebo.


Native Son wheelhouse rounding into shape.


Monday, June 15, 2009

Do the easy stuff first.

In the past I've been known to post a few pics with the promise that I would add descriptions at a later date and then let the fans down. Although I've been extremely busy I will now attempt to fill the blank space to the left and right of the four photos with interesting ramblings. You may be noticing right now that I have almost filled one of the spaces with a description of what I "am going to do" as I'm doing it (old blogging trick). Anyway the construction of the 32' Osmond has begun and as usual the first thing we did was install the spray rails (pictured left) and the quarter guards (pictured right). First the rails have to be cut to length using a chop saw. Holding the PVC rail tightly is the most important thing when using the chop saw, if the rails moves at all it can kick violently and cause damage to the saw, rail, or the operator.

The rails have been drilled out every 6" this way when the stainless steel is installed (also drilled every 6") none of the screw holes will hit each other. 1/4" stainless steel machine screws are tapped into the fiberglass hull and the rails are put on the boat. After all the holes have been drilled and the screws have been tightened all the screws are removed and the rails are taken off the boat. 5200 marine sealant is squeezed onto the boat and the rails are reinstalled for the final time. The excess 5200 is scrapped off with a plastic scrapper and then the entire area is wiped down with paint thinner until the 5200 residue is removed. Washers and nuts are spun onto all the machine screws inside the boat and then covered with hull and deck putty. Once the hull and deck putty hardens all the nuts and washers are fiberglassed over and then the rails can be considered completed. Its much easier to install a rail then it is to type all the steps on how to do it. All these words could have been replaced with a 4 minute video, that type of thing would help the "average time on site stats". Since June 1st the state with the highest "average time on site" has been Tennessee (8minutes 37seconds per visit). Not really boat related yet.........

The deck hatches on the 38' Northern Bay are rounding into shape. Aluminum gutters have been installed with couplings where hoses will connect to drain water overboard and keep the areas under the deck dry. Fiberglass panel has been glued to the sides of the aluminum using plexus and now the back deck is ready for finish sanding and gel coat. On Wednesday the owner of the boat made the trip to Maine from Georgia to inspect our progress, he seemed pleased. I was able to have a representative from Nautilus Marine Fabrication at the shop for the visit and we were able to make all the decisions about the anchor roller, bow rail, hand rails, ladder, fly bridge rail, and radar arch. All these stainless steel parts will be made off site and using all the measurements and patterns they will fit the boat perfectly and thanks to the owner's input they will be exactly what he is looking for.

Monstrous steering system pictured to the right has been a huge pain but is now completed (except for a couple of hoses). Choosing the style and manufacturer of the steering components took longer than expected then waiting on parts for much longer than anticipated were the first two hurdles to jump. Then making an adapter arm that would attach to the rudder posed another set of challenges. R. E. Thomas fabricated a split collar that could be bolted onto the rudder and John fabricated and welded an extension arm onto that part and after Dan spray painted it white the steering was finally completed.

Things are happening at CIBW, three boats in the shop, people calling about new boats every day, skiffs keep bouncing down the driveway for repairs, I hired another worker (possibly mentioned in the last post), boat owners are making trips to the shop, and we are the leading edge of the economic recovery in the boat building industry. This post was worth the wait??? Check back often. New content will be released every day for the next 10 days. Tell your friends. What's with no one leaving comments anymore?

Wednesday, June 10, 2009

New hull arrives............and more.

We must be getting close to completing the 38' Northern Bay, lots of expensive parts keep showing up via UPS. The windlass pictured is a Muir Atlantic 1200 and will be used to raise and lower the anchor rope. Sometimes I'll type a sentence like that and feel like I'm over explaining the post. But for every person that says "I know what a windlass is I didn't require the additional explanation" there is a person that says "what's that metal thing in the picture??" And for every two people that make those comments there is another two people that are saying "get back to typing about boat stuff, I don't care what these fictional people might or might not be saying." Anyway, the windlass will require 12volt power run to the motor through 00 cable. There will be three ways to operate it: wireless remote control (very cool), UP/DOWN switch located at the lower helm station (less cool), and a manual hand winch (not cool). Under the windlass has been reinforced with a backing pad and extra fiberglass to withstand the added strain. Lots of wires need to be run to make everything work correctly but now that it's mounted the difficult part of the job is completed.

Speaking of expensive boat parts, the solid backed stainless steel flat bar arrived and as you can see from the photo has been installed. Adding the silver has really improved the look of the gray PVC rails. The toe rails have been held back from the bow to leave space for the anchor roller/pulpit that will be installed as soon as it is fabricated. The side decks have been white gelled and now all the hardware (cleats, deck plates, etc...) can be installed. After everything has been installed a 1" white border will be taped off and then gray non-skid will be rolled on the remaining areas. A poor explanation that will be crystal clear after a photo is uploaded at a later date.

One of the larger problems with the galley on this boat was deciding where to put the garbage can. The winning idea was to build a tip out area to the right of the stove that will house a 36 quart garbage pail that would accept 13 gallon bags. Thanks to the power of digital photography and the Internet I was able to get the size and style of the trash can approved in minutes and the crew was able to cut out the door before the day was over. The goal will be to leave enough space behind the trash to store a full trash bag. However, looking inside the cabinet there might not be enough room to accommodate this goal.


The 32' Osmond arrived yesterday so now there are three boats in the main shop. Dan took some time today getting the boat on its lines. Following the recommendation of H & H Marine we set up the bow of the boat about 3" high. We'll spend the next couple days getting materials ordered to start building and I hope to have some bulkheads installed sometime next week. The boat has to be done by February 2010 (not sure if that's the
beginning or the end of that month) so we have to get going. Hopefully I'll still have time to post updates........

If you want to see video of the hull arriving at the shop click this link.

LINK

Friday, June 5, 2009

Tanks 'n' Valves

I like the old days when a bucket would be an acceptable plumbing system for the head. Click on this picture to zoom in and really appreciate the amount of clamps, clips, and fittings in this system. So the toilet lives through the door to the right of this photo. One 3/4" seacock will supply the water to the bowl. The waste or "black water" will travel through a 1.5" hose to the black Y-valve tucked to the right (slightly blocked in this photo). This valve can divert the black water to the holding tank (large white square) or directly into the ocean (first through a bronze Y-valve then through a 2" seacock). If the black water is sent to the holding tank eventually after 25 gallons of flushes it will have to be emptied. The second Y-valve (black valve center) will send the black water to a macerator pump (where it is chopped up and pumped into the ocean) or send it to a deck plate in the side deck of the boat where it can be vacuumed out at a marina into a waste facility. That does it for the "black water" system but the boat need to be outfitted with a "grey water" system as well. Grey water can be classified as any dirty water that didn't come from the toilet (sink and shower water). Both sinks drains and the shower drain send the water into an aluminum holding tank (not pictured). This tank has a valve on it and once it is full the water is routed to a sump pump that will send all the grey water overboard. Getting all these hoses and valves to fit in this small area took a little bit of planning but once it was all mapped out Jeff did an excellent job with the installation.

To install the PVC rub rails and toe rails all the rails needed to be drilled with a countersink to accept the stainless steel hardware that would be used (toe rail #10 screws, rub rail #12 screws). The rails are then cut to length and held in place by 2-4 employees while someone drill holes (5/32nds for #10 and 3/16ths for #12) and drives screws to pin the rail down. Once all the rails are in place we trace the rail with pencil and take all the screws out and take the rails off the boat. White 5200 marine sealant is applied along the edge of the pencil line and over all the holes and then the rails are put back on the boat. Next all the 5200 that squeezed out from behind the rail needs to be scraped off with plastic scrappers (95 percent) and wiped off with paint thinner until all the extra 5200 has been removed. The final step will be fastening the stainless steel flat bar over all the exposed screw holes.

The Bermuda boat owner started a thread on a discussion board on Noreast.com. (click the blue to check it out). I also got an email today about a 23' lobster boat. God bless the internet.

Wednesday, June 3, 2009

Aluminum Parts.

In case I haven't mentioned it in the past, we have a welder on our staff that does excellent work. He's been working on some aluminum parts for the 38' Northern Bay. The wire chase inside the wheelhouse will be powder coated white and will cover all the wires and hoses that travel from the lower helm station to the fly bridge. Wires for the running lights, auto pilot, radar, vhf, the Mather's controls, and other wires will all have to fit in the tube. Of the three hydraulic hoses headed to the fly bridge only one will have to be routed through the aluminum (the other two will be routed from the support arch at the back of the wheelhouse to the engine room)

Aluminum double doors (two built, one pictured) were built to be installed in the cockpit cabinets. There were discussions about making fiberglass doors but I was successful in convincing the owner that the powder coated aluminum would be more functional just as attractive as the fiberglass equivalent. These doors will be fitted with locking latches to keep out all the honest criminals. With the battery charger, inverter, propane locker, and water maker all living in the cockpit cabinets I can appreciate the effort to keep everything locked up.


The three smaller aluminum doors are going to be installed up on the fly bridge. The front section of the fly bridge is the largest storage area on the boat so two of the doors will provide access to "the cave". On the side of the console the other door will be installed and it will give me the ability to work comfortably on all the wiring. I'll get some more pics of these doors after they return from powder coating and once they are installed they will look real impressive.

That's good enough for today, check back tomorrow for a new post. All of the fans that I had stockpiled have moved on to other boat blogs. Reading this quickly one thing is clear.........I need a thesaurus, I'm using the same 25 words over and over. Still knocking off the rust.

Tuesday, June 2, 2009

The boat that the blog sold......

Most of you were probably under the impression that I had been injured in some type of boat building accident that rendered my hands useless. What else could account for no blog posts?? Truth be told I can be lazy when it comes to keeping up with my web work (ask the gal that runs my site). I am back behind the keyboard and you will be pleased to hear that the blogs will be starting up again with the type of regimented entries that led to the Clark Island Boat Blog to become the 73rd highest rated Maine boat building blog (this fact is open for debate). Anyway, we have another boat to finish. The boat will be a 32' Osmond Beal for a gentleman in Bermuda. He was surfing the web and stumbled onto our site and after he voted "yes" on the "are you ever going to buy a boat" poll he felt obligated to follow through on his click. The rest of you (I won't list your names) should follow his lead and order your boat today. Once all the Bermuda orders start pouring in the waiting list may delay your project so call now, our operators are standing by.

Today I made the trip to H & H Marine (click on the name if you want to check them out) to inspect the hull before it was delivered. Everything looked great and the guys at H & H were friendly and helpful. I told them I would try to sell another boat so keep their hulls in mind when you are placing your order. The hull will be in the shop by Thursday baring any craziness.

The owner has taken great care in making a list of things he wants included in the boat and seems like he has been thinking about this for a while. Selecting the engine is the only part of the project that is producing stress at this point, but he is looking for a reliable motor that can be easily serviced in Bermuda. So if anyone has any suggestions please leave a comment about great experiences with motors in Bermuda.............

SHOP NEWS SHOP NEWS SHOP NEWS

Dan and Clay have been rebuilding an old Novi (new deck, new wheelhouse, new side decks)
Dan Jr, Jeff, and I have been slugging away on the 38' Northern Bay (pushing it toward the finish line)
John has been making aluminum doors and hatch frames for the 38' Northern Bay (along with 59 other smaller metal projects)
There are two skiffs in yard that need minor repairs.

So as you can see everything at CIBW is looking great........... except for the online store. I had my first order for CIBW gear and then quickly received an email from Zazzle that claimed that my stuff was violating copyright laws. Apparently the Grateful Dead own any skull shaped drawing with a lightning bolt through its head so I'm going to have to come up with something else to put on our shirts and mugs (ideas in this area would be appreciated). Maybe just "CIBW ROCKS" or "AFTER I PAYED MY BILL AT CIBW ALL I COULD AFFORD WAS THIS SHIRT/MUG" or "SAVE A BOAT BUILDER, BUY A BOAT" or "I WISH I HAD BETTER WAYS TO END POSTS".