pre-blog visits from 1/1/2007 to 2/23/2009.........6202 in 784 days........8 visits a day
post-blog visits from 2/11/2009 to 6/30/2009..........4014 in 139 days..........29 visits a day
i know no one cares about these stats, but its pretty cool.
Tuesday, June 30, 2009


Sunday, June 28, 2009
Guest Blog: Matt Finn
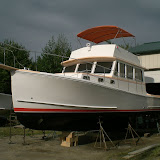
38' Holland finished by Matt Finn and Clark Island Boat Works.

My shop is in Lynn, MA. I have finished ten new lobster boats to date. Most of the boats I finished myself, I fish them for a season then sell them.
This project was different, the owner was a local guy who aw all of my boats and wanted on e as a pleasure boat for his family. We finished it over two winters, finished off bare bones so he could use it for season #1 and decided how he wanted to finish off the interior. This is what we came up with, full mahogany interior with a teak deck. Notice the rounded corner that forms the head, there is a quarter piece of PVC pipe glassed to plywood which I then covered with a mahogany veneer.
The Holland is powered with a 480 hp. Cummins which pushes "Caroline" to 26 knots. She holds 300 gallons of fuel and 60 gallons of water. She has a 2-1 ZF. gear turning a 2" shaft with a wet keel. The transom door and the swim platform are a must for family fun. The pot hauler is just for hauling the anchor, there will never be any bait aboard. All the hardware is bronze to give the boat that older look. The pot hauler is the only stainless steel on the boat, the owner would love me to find an old bronze unit.
Clark Island built and glassed the benches and the engine box. They did all the metal work including all the bronze fabrication. Everything they do is well thought out, take a close look at the radar mast. They are the best in the business and they take care what goes out the door.


I included some of my "Mitchell Coves." I have owned 5 of them. (35's and 32's)

Thanks Matt, I needed a break. I don't know if I would say that the boat was "finished" by Finn and CIBW, we just supplied some parts. Your woodwork is sick and I'm glad that you only have a one man crew or else you would probably be putting us out of business. Not bad for your first blog attempt, welcome to the 20th century.
Friday, June 26, 2009
This isn't the post for the day.


click on the images to see big photo.
I didn't build this boat, but if you like the looks I can build something similar.
Wednesday, June 24, 2009
Does anyone know a short electrician??
 This mess is the back side of electrical panels on the 38' Northern Bay. The 12 volt DC distribution panel is the largest panel located at the top of the photo. In the middle is the 110 volt AC panel. The bottom panel is the battery switches (discussed in previous posts). The red and black spaghetti will be sending the power to the various equipment on the boat. Only about 10 percent of the wire is visible in this picture the rest was pull off to the left so I would have room to work. Looking at all the wires at once it presented as a huge job but once the connections started being made the job is getting smaller all the time. Choosing which breaker will be controlling what piece of equipment is the tough part, after the job is done you want the breakers to be arranged in some type of order (all the lights together, all pumps together, electronics together, etc...) About needing a short electrician, to work on the back side of this panel you need to be standing on the raised step where the toilet is going to live. The headroom when standing on that step is around 5'7" and unfortunately I'm around 5'11" (not tall by any means but about 4" too tall for this project) so I spent all day with my head compressed into my shoulders. 2 or 3 more days of discomfort should put a good dent in the electrical system.
This impressive shot of the 32' Osmond is the planning stage of the forward floor construction. In trying to keep the proportions of the boat somewhat correct we worked backwards from the trunk height and
 then using a proposed headroom (approx 6'3") got a good idea of what the forward floor was going to look like. These measurements could be tweaked to make a little more floor space, the shape of this hull allows for raising a floor 2" and creating 31% more floor space (those numbers are fabricated and being exaggerated to illustrate my point). As long as something happens on this boat everyday, we should be able to launch it by February......
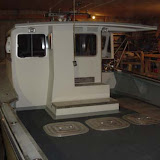
 A couple of days ago I was talking about a slight wheelhouse modification on Native Son, here is a picture of the completed modification. This boat is now being prepped for gel coat and paint. Window patterns have been taken although the owner may go with Plexiglas windows for the time being. John finished the new radar stand yesterday and Kendall has been making good progress sanding and taping. Clay moved the wheelhouse side without complaints and he was able to get it done quickly.
This "skiff" is in the shop for some minor work. So far we've painted the bottom and put a boot stripe on. Dan made a plastic bracket for the hydraulic trim tab pump. Once he mounts the pump six wire connections and two hoses will be the only thing holding up this job.
Thanks for checking back in for the words of content, 11pm as promised.
Tuesday, June 23, 2009


Monday, June 22, 2009


Sunday, June 21, 2009
I have clearly fallen off the rails.........
Did not go to work today, spent the day with the family and played a little golf in the afternoon.  I was able to try out my father's day present, a brand new SkyCaddie (very cool). Its a golf GPS that give accurate yardages to landmarks on each hole (pins, water, fairway, bunker, etc...). It was probably the greatest gift that a one year old has ever given to her father. Thanks Madelyn.
So through the power of the interwebs I found this guy that was trying to decide between building a windshield with 3 or 4 windows and for some reason I took some interest in helping with the choice. The hand drawn picture is from the kid building the boat (in Kansas City) and it shows the difference between the 3 and 4 window layout. I tried to explain some stuff in a response but words weren't getting the point across so I made and example computer drawing. I sent him an email asking about the actual dimensions so I could make a more accurate model (don't ask me why). Using the new information I made a 3D model of what the windshield would look like with 4 windows and then offered my opinion that 4 window would look sick (in a good way) compared to 3 windows. Clark Island Boat Works has no vested interest in the boat and yet I was compelled to do this. I will be seeing a doctor about this
  problem in the next few weeks unless the symptoms go away. As I was making the 3D model my wife was keeping an eye on the clock and kept asking me what the hell I was doing. Once it got to the 45 minute mark she told me to stop or get the kids address and send him a bill. He'll probably go with three windows and all my efforts will be for nothing. Oh well, it was fun to play on the computer and I think it came out pretty nice.
 I was able to try out my father's day present, a brand new SkyCaddie (very cool). Its a golf GPS that give accurate yardages to landmarks on each hole (pins, water, fairway, bunker, etc...). It was probably the greatest gift that a one year old has ever given to her father. Thanks Madelyn.
So through the power of the interwebs I found this guy that was trying to decide between building a windshield with 3 or 4 windows and for some reason I took some interest in helping with the choice. The hand drawn picture is from the kid building the boat (in Kansas City) and it shows the difference between the 3 and 4
 window layout. I tried to explain some stuff in a response but words weren't getting the point across so I made and example computer drawing. I sent him an email asking about the actual dimensions so I could make a more accurate model (don't ask me why). Using the new information I made a 3D model of what the windshield would look like with 4 windows and then offered my opinion that 4 window would look sick (in a good way) compared to 3 windows. Clark Island Boat Works has no vested interest in the boat and yet I was compelled to do this. I will be seeing a doctor about this
  problem in the next few weeks unless the symptoms go away. As I was making the 3D model my wife was keeping an eye on the clock and kept asking me what the hell I was doing. Once it got to the 45 minute mark she told me to stop or get the kids address and send him a bill. He'll probably go with three windows and all my efforts will be for nothing. Oh well, it was fun to play on the computer and I think it came out pretty nice.
Saturday, June 20, 2009
Clear communication is the key.
 Sometimes when doing these custom projects an owner's wishes are not completely understood and this can lead to problems. Sometimes what we want to do or what we think will work the best influences our decisions during a project. Sometimes we have to make changes based on customer reactions. Native Son needed one major change, fixing the starboard side of the wheelhouse. During the design phase poor communication (on both sides) led to the wheelhouse being built offset to the port side. Once the owner saw the progress I could tell that he was bothered by it. I decided right away that it was not worth arguing and promised that I would make sure that the problem was solved. Most of the time when work has to be undone/redone the toughest part is just making the choice to start. Frustration about changes is normal but at Clark Island Boat Works the customer is always right. Anyway we were able to cut the starboard part of the windshield out make a few cuts and shift the front and side window to a more symmetrical location. This is going to improve the look of the wheelhouse and make for a very happy boat owner.
 Big wires on the 38' Northern Bay. This is the back side of the custom battery switch panel that we fabricated out of aluminum and had powder coated black (to match the other electrical panels). Three switches were bolted to the aluminum and then the aluminum was bolted through the panel on the starboard side of the companionway. The switch located to the left is for the engine batteries, the switch to the right is for the house batteries, and the switch in the middle connects all the batteries on the boat. This middle switch could be called the emergency crossover connection, it will give the user the ability to start the motor with the house batteries if he accidentally kills the start batteries. Most of these wires are 4/O (some 2/O on the shorter runs) and all the lugs have been crimped on with a ginormous set of crimps. Once the ends are crimped heat shrink wrap is used to seal all the connections.
 1/2" Plywood has been screwed to the overhead inside the wheelhouse of the 38' Northern Bay. This will be the layout of the teak that will be holding up the headliner. The photo won't show all the required steps and really it isn't all that exciting of an explanation so I just skim over it. Measurements, Pencil Lines, Cut Plywood, Drill Plywood, Cut Plywood, Drill Overhead, Drive Screw, Repeat. Now that the plywood is up all the wires can be run to power the overhead lights, fans, and wipers. Every wire has to be run individually (to fit under the headliner) and clipped every 4". I'm going to try to get most of the wires clipped up tomorrow (Sunday) but it might be a two day project. Holding drills over your head all day can be rough on the shoulders.
SHOP NEWS SHOP NEWS SHOP NEWS
Dan Jr has been sanding, painting, and fiberglassing hatch frames.
Jeff helped me with the wheelhouse overhead and did all the big wiring (picture 2).
John made some exhaust modifications and made a new radar stand for Native Son.
Kendall has been sanding, painting, and fiberglassing wheelhouses.
Clay had to do some skiff repair and fixed the wheelhouse on Native Son.
Dan has been looking into hull prices and availability for all the boats we have to build.
I've been keeping everyone busy, taking pictures, returning emails, and working on boats.
Friday, June 19, 2009
Pictures Only.........Its Content.
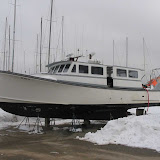
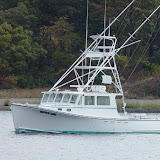
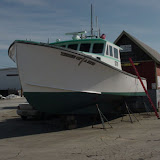
 The old Kara Lee, now Breaker. Two large fish.


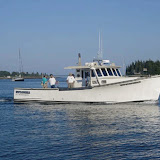
23' Crowley Beal. Possibly the next
boat that we are going to build.
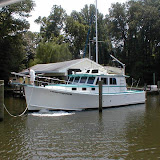
The completed Flozebo.
Native Son wheelhouse rounding into shape.
boat that we are going to build.
The completed Flozebo.
Native Son wheelhouse rounding into shape.
Monday, June 15, 2009
Do the easy stuff first.
 In the past I've been known to post a few pics with the promise that I would add descriptions at a later date and then let the fans down. Although I've been extremely busy I will now attempt to fill the blank space to the left and right of the four photos with interesting ramblings. You may be noticing right now that I have almost filled one of the spaces with a description of what I "am going to do" as I'm doing it (old blogging trick). Anyway the construction of the 32' Osmond has begun and as usual the first thing we did was install the spray rails (pictured left) and the quarter guards (pictured right). First the rails have to be cut to length using a chop saw. Holding the PVC rail tightly is the most important thing when using the chop saw, if the rails moves at all it can kick violently and cause damage to the saw, rail, or the operator.
 The rails have been drilled out every 6" this way when the stainless steel is installed (also drilled every 6") none of the screw holes will hit each other. 1/4" stainless steel machine screws are tapped into the fiberglass hull and the rails are put on the boat. After all the holes have been drilled and the screws have been tightened all the screws are removed and the rails are taken off the boat. 5200 marine sealant is squeezed onto the boat and the rails are reinstalled for the final time. The excess 5200 is scrapped off with a plastic scrapper and then the entire area is wiped down with paint thinner until the 5200 residue is removed. Washers and nuts are spun onto all the machine screws inside the boat and then covered with hull and deck putty. Once the hull and deck putty hardens all the nuts and washers are fiberglassed over and then the rails can be considered completed. Its much easier to install a rail then it is to type all the steps on how to do it. All these words could have been replaced with a 4 minute video, that type of thing would help the "average time on site stats". Since June 1st the state with the highest "average time on site" has been Tennessee (8minutes 37seconds per visit). Not really boat related yet.........
 The deck hatches on the 38' Northern Bay are rounding into shape. Aluminum gutters have been installed with couplings where hoses will connect to drain water overboard and keep the areas under the deck dry. Fiberglass panel has been glued to the sides of the aluminum using plexus and now the back deck is ready for finish sanding and gel coat. On Wednesday the owner of the boat made the trip to Maine from Georgia to inspect our progress, he seemed pleased. I was able to have a representative from Nautilus Marine Fabrication at the shop for the visit and we were able to make all the decisions about the anchor roller, bow rail, hand rails, ladder, fly bridge rail, and radar arch. All these stainless steel parts will be made off site and using all the measurements and patterns they will fit the boat perfectly and thanks to the owner's input they will be exactly what he is looking for.
 Monstrous steering system pictured to the right has been a huge pain but is now completed (except for a couple of hoses). Choosing the style and manufacturer of the steering components took longer than expected then waiting on parts for much longer than anticipated were the first two hurdles to jump. Then making an adapter arm that would attach to the rudder posed another set of challenges. R. E. Thomas fabricated a split collar that could be bolted onto the rudder and John fabricated and welded an extension arm onto that part and after Dan spray painted it white the steering was finally completed.
Things are happening at CIBW, three boats in the shop, people calling about new boats every day, skiffs keep bouncing down the driveway for repairs, I hired another worker (possibly mentioned in the last post), boat owners are making trips to the shop, and we are the leading edge of the economic recovery in the boat building industry. This post was worth the wait??? Check back often. New content will be released every day for the next 10 days. Tell your friends. What's with no one leaving comments anymore?
Wednesday, June 10, 2009
New hull arrives............and more.
 We must be getting close to completing the 38' Northern Bay, lots of expensive parts keep showing up via UPS. The windlass pictured is a Muir Atlantic 1200 and will be used to raise and lower the anchor rope. Sometimes I'll type a sentence like that and feel like I'm over explaining the post. But for every person that says "I know what a windlass is I didn't require the additional explanation" there is a person that says "what's that metal thing in the picture??" And for every two people that make those comments there is another two people that are saying "get back to typing about boat stuff, I don't care what these fictional people might or might not be saying." Anyway, the windlass will require 12volt power run to the motor through 00 cable. There will be three ways to operate it: wireless remote control (very cool), UP/DOWN switch located at the lower helm station (less cool), and a manual hand winch (not cool). Under the windlass has been reinforced with a backing pad and extra fiberglass to withstand the added strain. Lots of wires need to be run to make everything work correctly but now that it's mounted the difficult part of the job is completed.
 Speaking of expensive boat parts, the solid backed stainless steel flat bar arrived and as you can see from the photo has been installed. Adding the silver has really improved the look of the gray PVC rails. The toe rails have been held back from the bow to leave space for the anchor roller/pulpit that will be installed as soon as it is fabricated. The side decks have been white gelled and now all the hardware (cleats, deck plates, etc...) can be installed. After everything has been installed a 1" white border will be taped off and then gray non-skid will be rolled on the remaining areas. A poor explanation that will be crystal clear after a photo is uploaded at a later date.
 One of the larger problems with the galley on this boat was deciding where to put the garbage can. The winning idea was to build a tip out area to the right of the stove that will house a 36 quart garbage pail that would accept 13 gallon bags. Thanks to the power of digital photography and the Internet I was able to get the size and style of the trash can approved in minutes and the crew was able to cut out the door before the day was over. The goal will be to leave enough space behind the trash to store a full trash bag. However, looking inside the cabinet there might not be enough room to accommodate this goal.
The 32' Osmond arrived yesterday so now there are three boats in the main shop. Dan took some time today getting the boat
 on its lines. Following the recommendation of H & H Marine we set up the bow of the boat about 3" high. We'll spend the next couple days getting materials ordered to start building and I hope to have some bulkheads installed sometime next week. The boat has to be done by February 2010 (not sure if that's the
beginning or the end of that month) so we have to get going. Hopefully I'll still have time to post updates........
If you want to see video of the hull arriving at the shop click this link.
LINK
Friday, June 5, 2009
Tanks 'n' Valves
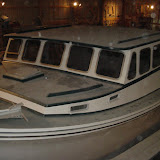
 I like the old days when a bucket would be an acceptable plumbing system for the head. Click on this picture to zoom in and really appreciate the amount of clamps, clips, and fittings in this system. So the toilet lives through the door to the right of this photo. One 3/4" seacock will supply the water to the bowl. The waste or "black water" will travel through a 1.5" hose to the black Y-valve tucked to the right (slightly blocked in this photo). This valve can divert the black water to the holding tank (large white square) or directly into the ocean (first through a bronze Y-valve then through a 2" seacock). If the black water is sent to the holding tank eventually after 25 gallons of flushes it will have to be emptied. The second Y-valve (black valve center) will send the black water to a macerator pump (where it is chopped up and pumped into the ocean) or send it to a deck plate in the side deck of the boat where it can be vacuumed out at a marina into a waste facility. That does it for the "black water" system but the boat need to be outfitted with a "grey water" system as well. Grey water can be classified as any dirty water that didn't come from the toilet (sink and shower water). Both sinks drains and the shower drain send the water into an aluminum holding tank (not pictured). This tank has a valve on it and once it is full the water is routed to a sump pump that will send all the grey water overboard. Getting all these hoses and valves to fit in this small area took a little bit of planning but once it was all mapped out Jeff did an excellent job with the installation.
 To install the PVC rub rails and toe rails all the rails needed to be drilled with a countersink to accept the stainless steel hardware that would be used (toe rail #10 screws, rub rail #12 screws). The rails are then cut to length and held in place by 2-4 employees while someone drill holes (5/32nds for #10 and 3/16ths for #12) and drives screws to pin the rail down. Once all the rails are in place we trace the rail with pencil and take all the screws out and take the rails off the boat. White 5200 marine sealant is applied along the edge of the pencil line and over all the holes and then the rails are put back on the boat. Next all the 5200 that squeezed out from behind the rail needs to be scraped off with plastic scrappers (95 percent) and wiped off with paint thinner until all the extra 5200 has been removed. The final step will be fastening the stainless steel flat bar over all the exposed screw holes.
The Bermuda boat owner started a thread on a discussion board on Noreast.com. (click the blue to check it out). I also got an email today about a 23' lobster boat. God bless the internet.
Subscribe to:
Posts (Atom)